The scope has been assembled and inspected for overall
fit and finish. Every scope has a generous slide fit. The fit on the slide
has been made so that it has a free running fit in the magnesium housing.
When you loosen the elevation lock you will notice that there is some side
play. This is not a problem since we have checked these for repeatability
and done several years of field-testing. As long as you remember to
tighten the elevation lock you will not have a problem. One thing that
happens if you forget to tighten the windage lock, the lens ring, anchor
knob, or the elevation lock, the scope will let you know. The noise that
it makes is what we refer to as the “brain fart rattle.” It will probably
happen to you once maybe twice. At this point, even if you “dry fire” your
bow the scope will still survive.
Maintenance
The Mag Sight Pro – 3D TM and the Mag Sight Hunter – 3D TM are made out of
high grade polymers, anodized aluminum, brass, cold-rold steel, stainless
nuts and bolts, and a patented magnesium finished body. You will not
require a short length of pipe on any of the allen wrenches to tighten
down any of the socket head bolts. In most cases you can tighten things
down with the short end of the allen wrench. The typical scope maintenance
required is that the lens and lens housing occasionally get cleaned with
our MAG SIGHT PRODUCTS LENS CLEANER and a soft cloth. Along with the
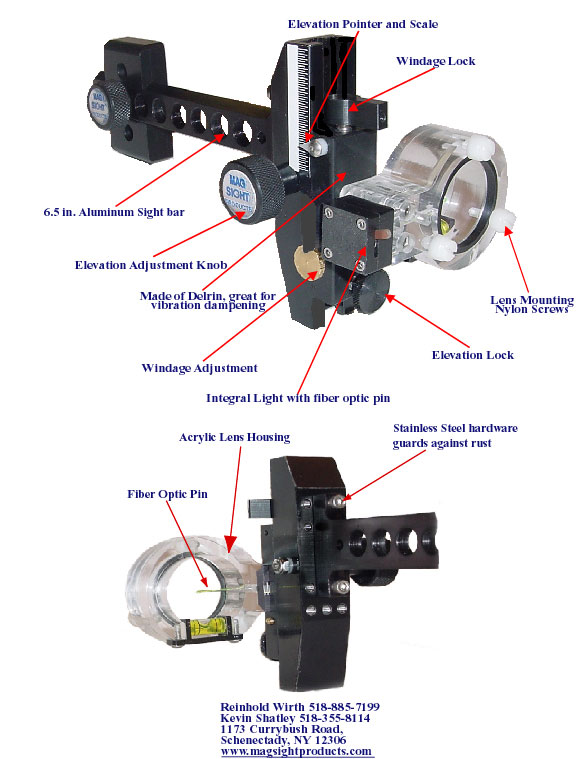
typical maintenance, you may have to reposition the windage lock. The
windage lock works by compressing a small plastic dowel against the
windage bar and it will, in fact, squeeze the dowel slightly shorter over
a period of time. The proper position as you look down on the top of the
scope, sight bar pointing down, is about “Two O’clock.” If the
windage lock begins to touch the magnesium housing it’s time to readjust
it. To readjust, simply tighten the lock as far as possible, loosen the
6-32 set screw inside the lock, reposition and tighten the setscrew. On
the Hunter Model simply use the allen wrench and tighten until snug. The
Nylock nut may also require a small amount of tightening occasionally to
maintain a smooth motion and stay in place while tightening the elevation
lock just before you shoot.
Battery Replacement on the Lamp House
The Lamp house contains both LED and Batteries available at you local
Radio Shack or electronics store, sometimes the batteries may even be
found at some of the larger chain drug stores. The LED is a 430Nm
wavelength light, which is in the near U.V. range. Try not to look
directly into it. The U.V. is what make the fluorescent fibers light up so
brilliantly. The batteries are a #1025 (generic number) and must be put
in, in exactly the same orientation as they came out. There is a polarity
to the lamp, so + and – must be observed. After unscrewing the 4-40 screws
and taking the lamp housing apart, should you forget how they came
out….simply put one in positive side up and the other positive side down.
If it doesn’t light the LED… reverse the order and try again. If it still
doesn’t work you may need a new LED. We do keep LEDs in stock and they
will cost you $ 2.50 + shipping and handling in the event you can’t get
them at you local electronic store. One more important point. The slide
switch is a piece of machined circuit board. One side has copper, (the
conductor) the other side has none, and you have to place it back so the
copper touches the batteries. You may use any method you choose for
cleaning the copper, from a pencil eraser to commercial copper cleaner.
You will also notice that there is a small cut in the copper. That side
must be installed towards the domed side (negative) of the battery or you
will be unable to turn off the light. The procedure of changing batteries
is not that difficult, especially after you have done it once or twice.
Just as a reminder….Don’t forget to turn the light off when you’re done
shooting. You will drain the batteries in about 1-2 hours if left on.
Installation on Your Bow
Now that you’ve read all the boring stuff, let’s get it on your bow. All
the hardware including the 10-24 socket head bolts should be in your
package. First take the dovetailed anchor plate and bolt it to the riser.
Remember don’t over tighten it, but make sure it’s not going to move
either. Next, slide the scope into anchor plate and lock it in the
position you plan to shoot. With a bow vice or help from a friend hold the
bow as you normally would. Place an arrow in the bow (not drawn) and sight
down the arrow while looking up at the scope sight pin. If you are
fortunate enough to be close in windage simply loosen the windage lock and
adjust the windage knob until you achieve the appropriate results.
Remembering to lock it before shooting. If the sight pin is off by more
than a few turns of the windage adjustment you will have to pick the
appropriate mounting holes on the magnesium body or the windage bar that
holds the lens housing. Try not to move the windage bar in too tight or
too far out so it allows ample room for adjustment either way later.
Leveling Your Scope
Use whichever technique you desire to hold you bow level While maintaining
it in a level position, loosen the socket head bolts holding the lens
housing in place just enough so that you may now physically rotate the
lens housing to bring the spirit level in place (level). To achieve third
axis level, you must rotate your bow to the desired arc and secure the
bow. With the bow secured, loosen the 6-32 button head screws on the
anodized spirit level frame just enough so that it may be leveraged into
position with a small screwdriver or pocketknife. Move the side furthest
away from the bubble up until the bubble is centered. If you went too far
loosen both screws push the frame back and start over. If you have any
questions, contact your dealer or our web sight.


